Showing posts with label cake. Show all posts

Monday, 5 March 2012

Labour(ful) Day

4 comments
Despite today being Labour Day, a day when most Western Australians take a break from labouring, I found it still a busy day baking this cake, making presents, running erands, and assignmenting. Since it was someone's special day today, I decided to attempt to bake a layered cake.
Honestly it was a spur-of-the-moment-idea. I just felt like I had to give it go. It's an amateur attempt at making three different layers and then combining them and the process of making it was different from how I imagined it. I didn't think the sponge layer would turn out quite so thick when encasing it in the custard. I didn't think the jelly top would be as fragile to handle as it turned out to be. I didn't think that we had ran out of caster sugar so I used raw sugar instead.
But I'm certain that this will not be the last attempt at a layered cake. The texture was moist, fluffy, muffin-like. It was actually quite fun! Next time I'll be prepared. Must work hard. Victory loves preparation!!

Berry Yoghurt Cake
Ingredients: 
125ml (1/2 cup) yoghurt
160g (3/4 cup) raw sugar
3 eggs
95g (1/2 cup) ground almond
140g (1 cup) self raising cake flour
125ml olive oil

Direction:
  1. Preheat oven to 180 degrees Celsius. Grease a 20cm round pan.
  2. Mix yogurt, sugar and eggs together.
  3. Add almond meal and mix. Then sift in flour and mix.
  4. Pour oil in slowly whilst mixing. 
  5. Put mixture into round pan. Bake 40-50 minutes or until skewer comes out clean when inserted.
  6. Cool 15-20 minutes before removing from pan.

Tuesday, 28 February 2012

An Uncalled For Cake Exchange

4 comments
It's been a long time since I baked my last chiffon cake which I recalled being an unpleasant bake. It was a strawberry chiffon cake which I have not posted up because it was too sweet and sour to share.

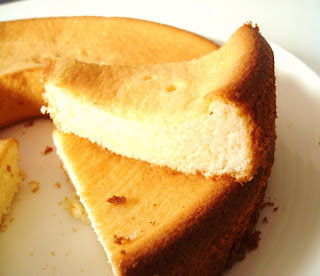
So here's another lemon chiffon cake attempt using the same recipe I baked a while back. Since I baked the chiffon cake last night and left it to cool overnight, someone must have gotten hungry, unmolded it last night and took a chunk out of it. Who's the culprit? Well, this morning I still managed to capture pictures of the remaining cake before it became breakfast for my hungry siblings.

This morning I also happen to drop by my cousin's place with some slices of lemon chiffon cake to share. And they had just finish baking a banana cake which was really very moist and delicious (thank you G ^.^). So I exchanged a slice of chiffon cake for a slice of moist banana cake and joined them for breakfast with a nice cup of hazelnut coffee. A warm and pleasant morning to begin the day with, sweet enough for me.


Sunday, 12 February 2012

Fascinating and French: An Almond Friand

0 comments
Did you know that "friand" means "fond of"? Je suis friand de chocolat means I am fond of chocolate. I find the french just absolutely amazing; how they come up with such exquisite creations, one will always wonder. A friand is actually a bite-sized cake traditionally made from almond meal, butter, sugar, egg white and flour. They usually have a flavor folded through them such as assorted berries, chocolate, citrus, and other fruits. 

Today was my first time baking a friand and my second time eating a friand. The first time I ate a friand and heard about it was my cousin's strawberry friand. It had a slight tang, subtle sweetness, and nice moistness. As we made the almond friand, I noticed the beautiful consistency of the batter. When it was being baked, each individual friand rose with such elegance. Taking a bite of it was every bit as palatable and delectable. It truly is a bake to be fond of.


Almond Friand
Makes about 40 mini cupcake-sized

Ingredients:
1 1/2 cups (185 grams) icing sugar
1 cup (150 grams) plain flour
5 egg whites, lightly beaten
180 grams butter melted
1 teaspoon vanilla essence
1 packet (approx. 100 grams) almond flakes

Directions:

  1. Preheat the oven to 180 degrees Celsius. Prepare a two 24 mini muffin mold non-stick baking trays.
  2. Sift and combine the icing sugar, plain flour and almond meal together.
  3. Mix the egg white, melted butter and vanilla essence together then add to the dry ingredients mixture and stir until just combined.
  4. Spoon the mix into each mold and fill 3/4 full. Sprinkle almond flakes on top of each. 
  5. Bake for approximately 12-15 minutes or until the tops are browning or when a skewer is inserted, it comes out clean. Allow to cool for 5 minutes before removing from the tray. Enjoy (;

Saturday, 19 November 2011

Make, Bake, Have Some Cake In A Cup

0 comments
Not the prettiest layered cheesecake, but it tasted alright. You see, I've always wanted to try making an evenly layered cake. Every time I go pass a store that sells cakes, their little goodies makes me admire the precision and beauty in the making of layered bakes. Yes, I'm one of those girls who like to stop and stare for a while at any decorated cake or dessert (but never have the time to sit and enjoy it with someone, yet occasionally I do get the chance and that's enough for me).
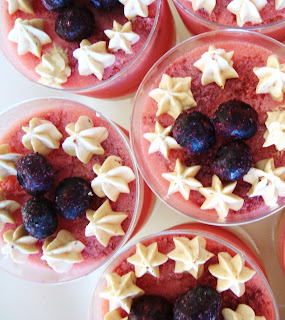
I was hoping to make a layered strawberry jelly cheesecake but it turned out uneven, and I felt that there was a little too much jelly. The bottom layer is a butter cookie crumble layer, followed by a berry cream cheese layer, a thin layer of pure strawberry jelly, and then a strawberry jelly mousse topped off with some blueberries and jam-butter-cream-cheese-cream swirls. But I am sure people enjoyed it anyways as I didn't see the last of the 20 cups when I entered the dining hall for lunch (well, 19 to be honest as my sister ate one the night before). Dessert first is best, occasionally (;

Berry Jelly Cheesecake In A Cup
Makes 10

base
1/4 cup of butter softened
1/4 cup of brown sugar
1 cup of plain flour

cream cheese layer
250 grams of cream cheese
50 grams of caster sugar (optional)
1 cup berry-flavored yogurt
1 teaspoon of gelatin powder
40 ml boiling water

jelly
1 packet of strawberry jelly
1 cup of boiling water
1/2 cup of cold water

jelly mouse
1 packet of strawberries and cream jelly
3/4 cup boiling water
3/4 cup of whole milk (ratio of milk to water are rough estimates, I used half milk and half water but can be adjusted for a creamier or lighter taste)
1 punnet of sliced strawberries

Directions:
base...

  1. Preheat the oven to 150 degrees Celsius.
  2. Cream the butter and sugar together and then fold in the flour until the mixture becomes consistent and dough-like.
  3. Divide the mixture into rough cookie shapes and place onto a baking tray covered with baking paper. Bake for about 15 minutes or until golden. 
  4. While warm, crush the cookies until they resemble fine crumbs and press into cup or mold.
  5. Chill this while making the cream cheese.
cream cheese layer...
  1. Beat the cream cheese, sugar, and yogurt together.
  2. Dissolve the gelatin in the water and then add into the cream cheese mixture.
  3. Divide mixture between the cups or mold.
  4. Chill for at least 4 hours.
jelly...
  1. Pour a cup of hot boiling water into a bowl and stir through the jelly crystals. Set aside to cool.
  2. Then add the cold water. Chill for at least 4 hours.

jelly mousse..
  1. Pour a cup of hot boiling water into a bowl and stir through the jelly crystals. Set aside to cool.
  2. Then add the milk and stir in strawberries.
  3. Add to the cups or mold. Chill for at least 4 hours.
  4. Garnish the top of the cup with more berries or cream.
Note: I would have swapped the jelly layer with the jelly mousse as milk, strawberries and jelly don't seem to mesh together too well to give a pretty look.

Monday, 14 November 2011

Decadent Chocolate Cheesecake

1 comments
When my cousin sister requested something "chocolate-y" and "cheesecake-y", I just had to put this decadent chocolate cheesecake together. I've never tried piping and decorating a cake before (I usually spoon a spoonful of cream or something and then use a toothpick to make swirls), so I was really playing with the elements I had before placing them on the cake.
It kind of looks like the macarons around the cake are half sunk into the cake, doesn't it? 
Anyways the cheesecake was a hit; creamy chocolate cheese filling, a little chocolate hit from the chocolate button, chewy chocolate macaron, and crunchy with the chocolate biscuit base . Note: best not eaten after a heavy meal (e.g. KFC or any other fast food for that matter...because we did and everyone didn't look so good afterwards). 

Decadent Chocolate Cheesecake
Serves 8-10

Ingredients:
base
125 grams of chocolate biscuits (I made my own the previous day creaming together a 1/2 cup of butter softened with 1/4 cup brown sugar, then added 1 cup all purpose flour and mixed. I spooned the mix onto baking paper into about 12 proportions and baked it for 20 minutes in a preheated oven at 150 degrees Celius)
60 grams of melted butter


filling
250 grams of cream cheese, softened
1/4 cup brown sugar
2 egg yolks (I think this can be omitted)
1 cup cream, whipped
125 grams milk chocolate

Directions:

  1. Prepare the base first by mixing the biscuit crumbs (crush the biscuits beforehand) with the butter and then press this into a 20cm diameter spring form cake pan (or prepare a cake tin by lining with baking paper). Refrigerate this.
  2. Melt the chocolate in a bowl over a pot of boiling water.
  3. Beat cream cheese until smooth then beat in the brown sugar. Add lightly beaten egg yolks and melted chocolate and mix well. Then gently fold in whipped cream.
  4. Pour over the biscuit base now in the cake pan. Then smooth the surface. Add any decorations or other elements as desired. Chill for at least 4 hours before serving. 

Monday, 31 October 2011

A Little Lemon Chiffon Cake

2 comments
As you can probably tell, this is a fail chiffon cake because it's little. Definitely wrong pan size :(
 I still have yet to search for the perfect recipe for my chiffon tin pan.
 Despite the chiffon cake being small, it tasted tangy and tasty. 
Happy Home Baking was my source of inspiration.

Sunday, 30 October 2011

I See Ice Cream

0 comments
Whenever I see there's a 4 litre tub of ice cream sitting in the fridge and there's a birthday coming soon, I'll whip up an ice cream cake.
It's simple as can be. Just let the ice cream soften a little at room temperature and then work into a desired plate mold. Decorate as you wish. For the ice cream cake featured above, it was my little brother's 14th so I decorated it with Cottee's Ice Magic chocolate flavored and topped it off with some walnuts. 
I made two ice cream cakes as all my cousins and siblings had come to celebrate so the second cake featured chocolate ice cream, Cottee's Ice Magic chocolate flavouring, and some glazed cherry to decorate.
This ice cream cake was for my own birthday, inspired by Ferrero Rocher I used Nutella to create the swirls and sprinkled some crushed peanuts on top. 

All of them took less than 10 minutes to make and it's so easy and flexible. I scream for ice cream, we all scream for ice cream!!
 

Yes, I can bake. Copyright © 2012 Design by Ipietoon Blogger Template