Thursday, 24 November 2011

Can't Get Enough Of Cookies On Sticks

0 comments
My aunty gave me a recipe for soft chewing chocolate chocolate cookie which I just had to try. I hope I did justice to the recipe.
I ended up making double the batter because of two farewell occasions. Some for work colleagues and some for the children in the school that I am volunteering in. So I made some pretty and decorated, and some classic homestyle-looking cookies. 
These cookies just make you speechless after the first bite. It's so soft and slightly chewy, and it just crumbles    then melts in your mouth. Delightful and delicious.


Soft Chew Chocolate Cookies

Makes 36-40


Ingredients:

  • 2 cups all-purpose flour
  • 4 tablespoon coco power
  • 1/2 teaspoon baking soda
  • 1/2 teaspoon salt
  • 1 cup unsalted butter, melted
  • 1 cup packed brown sugar
  • 1/2 cup white sugar
  • 1 tablespoon vanilla extract
  • 1 egg
  • 1 egg yolk
  • 2 cups semisweet chocolate chips
  •    Or semisweet white chocolate chips
  •    Or 1 cup each of semisweet chocolate chip and semisweet white chocolate chips
  •    Or 2/3 cup each of both chocolates with 2/3 cup mini size marshmallow .


Directions:

  1. Preheat the oven to 325 degrees F (165 degrees C). Grease cookie sheets or line with parchment paper.
  2. Sift together the flour, baking soda ,coco power and salt set aside.
  3. In a medium bowl, cream together the melted butter, brown sugar and white sugar until well blended. Beat in the vanilla, egg, and egg yolk until light and creamy. Mix in the sifted dry ingredients until just blended. Stir in the chocolate chips by hand using a wooden spoon. Drop cookie dough 1/4 cup at a time onto the prepared cookie sheets. Cookies should be about 3 inches ( 7 cm ) apart.
  4. Bake for 15 to 17 minutes in the preheated oven, or until the edges are lightly toasted. Cool on baking sheets for a few minutes before transferring to wire racks to cool completely.


My Aunty's baking tips on this recipe :)

1. I will set alarm of baking time to 13 minutes, and check on back of the cookie if light brown yet and also cookie edges if lightly toast or burn . So, you have chance not to over bake it. If edges of cookie is burn, better take it out.  Cookie always taste good even under cook, but when it over bake and burn then that sucks. 

2. Don't press cookie flat this time , because due to the baking, it will go flat itself and keep moisture inside them.

Happy baking my dear!!! Chocolate cookie always go well with cold milk in summer!!!

Wednesday, 23 November 2011

Coffee At C15

0 comments
There was a nice atmosphere about this place and it was just another nice place to chill nearby home. When the day winds down, it's nice to be able to "talk" and enjoy a cup of coffee or dessert with someone special.
Still, I always order the strangely mint-flavored items. This was my cup of ice chai mint latte. A treat from my cousin.
This was her cup of latte. I thought the cup seemed quite elegant and interesting.
While enjoying our coffees, we "talked" and observed our surroundings. It seems they serve relatively large proportions for the main meals. One day we might go back and try it.
The ceiling was even nice to stare into.
If you ever feel like chilling over a cup of coffee or breakfast, come down here.

Sunday, 20 November 2011

焦げパフ(kogepafu): Burnt Puff

1 comments
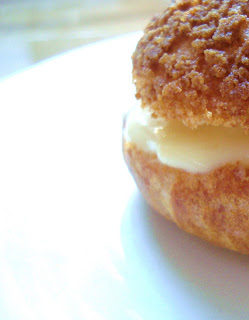
The first time I ate a cookie coated puff was in Melbourne. I never had anything like it. I remember that day me and my friend were strolling past the shopping centre to catch the bus and then we passed by the puffy store. In the spur of the moment, it caught my eye and then I had one in my hand. Thanks to my friend and tour guide, I was able to try this little sweet treat. 
The other day I came across a recipe on my friend's blog, Tray, and her creations almost resembled that cookie coated puff. I have been saving it up for a long time, hoping to recreate that little sweet treat I had with my friend that day. But to my dismay, it's not quite the same as that sweet moment. Yet in its own way, my little puff creations were special too.
Sadly they got left in the oven a little too long. Thus they became burnt puffs. That was why there was a slight burnt smell waffling in the kitchen at the time, but I couldn't figure out where it was coming from. 

It reminds me of the story of Kogepan, the burnt red bean bread man, a Japanese animated character.
The poor little red bean bread accidentally fell off the tray after finishing baking and got cooked some more, until its skin was no longer a golden color and it smelt awful. But not to worry.. about half the tray of cookie coated cream puffs were burnt so they kept each other company. On the other hand, Kogepan was alone and nobody bought it. Other red bean buns mocked it and even its baker did not pay attention to it. Kogepan's only dream was to become a delicious red bean bun.
Anyways enough of that story, but if you'd like to read on then you can visit here. All the cookie coated cream puffs here were treated with care and eaten with love. Afterall, what's not to love about a little sweet treat despite the slight discoloration and smell.
Ahhh...open wide and enjoy!

Cookie Topped Choux Puffs
Makes 10-12

cookie dough
25 grams plain flour
25 grams unsalted butter
25 grams caster sugar

choux puff
30g all purpose flour
30g cake flour
40g unsalted butter
100ml water
5g castor sugar
pinch of salt
2 eggs (100g)


vanilla custard cream
(Note: this is my own recipe, as I didn't have any vanilla pods in the pantry)
1 cup of fresh milk
1/2 cup of thickened cream
2 large eggs
1 egg yolk
2 tablespoons of plain flour
2 teaspoons of vanilla essence

Directions:
cookie dough...

  1. Place the butter in a bowl and use a spoon to mash until slightly softened.
  2. Add in the sugar and mix to combine.
  3. Add the flour and use a spatula to mix till combined. Wrap with cling wrap and roll into a mini cylinder. Place in the freezer to chill for at least half an hour.

choux puff...

  1. Preheat oven to 200°C.
  2. Place water, butter, sugar, salt in saucepan.Heat the mixture till the butter melts and boils. Remove from heat, add the flour into the saucepan. Using a heatproof spatula, stir the mixture quickly to mix.
  3. Place the saucepan back over medium heat. Stir constantly with the spatula while letting the moisture from the mixture evaporate. The dough should become less watery and be stickier. When a thin layer of skin forms on the base of the saucepan, remove saucepan from heat.
  4. Dump the dough into a mixing bowl, and while the dough is still warm, add in the eggs one at a time. Using the spatula, stir the mixture quickly to mix in the egg. When the mixture is smooth, add in remaining egg bit by bit (you might not need all of it) and repeat quick stirring motions until the eggs are fully mixed in and mixture appears smooth.
  5. Transfer the dough to a piping bag (I used a zip lock bag and snipped the tip off). Line a tray with baking paper. Pipe swirls of the dough onto the tray. You should end up with approximately 10 puffs.
  6. Remove the cookie dough from the freezer, slice into ten (or more) pieces and place on top of the piped puffs. Press down slightly and ensure that the cookie rounds are in the center of the puffs (if not you'll end up with lopsided cookie tops!).
  7. Place in preheated oven and bake for 30 minutes. Cool before filling with desired fillings.
vanilla custard cream...
  1. Place milk and cream in a bowl and turn the heat on low.
  2. In another bowl whisk the sugar and egg together until the sugar dissolves. Then add the flour and whisk until the mixture turns slighty pale in color.
  3. When the egg mixture is ready, turn the milk mixture on high heat and pour the egg mixture in while stirring. Turn the heat on medium and stir until the mixture thickens slightly (about 3-5 minutes). Adjust the temperature lower if mixture begins to burn slightly.
  4. Stir in vanilla essence. Serve warm or chill. Whisk the mix after chilling mixture before serving.

Recipe source of cookie dough and choux puff: Foodagraphy. By Chelle. 

Saturday, 19 November 2011

Make, Bake, Have Some Cake In A Cup

0 comments
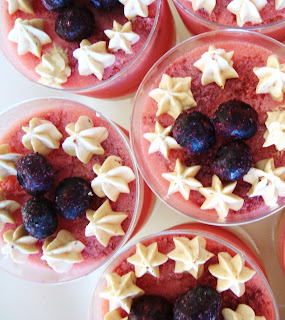
Not the prettiest layered cheesecake, but it tasted alright. You see, I've always wanted to try making an evenly layered cake. Every time I go pass a store that sells cakes, their little goodies makes me admire the precision and beauty in the making of layered bakes. Yes, I'm one of those girls who like to stop and stare for a while at any decorated cake or dessert (but never have the time to sit and enjoy it with someone, yet occasionally I do get the chance and that's enough for me).
I was hoping to make a layered strawberry jelly cheesecake but it turned out uneven, and I felt that there was a little too much jelly. The bottom layer is a butter cookie crumble layer, followed by a berry cream cheese layer, a thin layer of pure strawberry jelly, and then a strawberry jelly mousse topped off with some blueberries and jam-butter-cream-cheese-cream swirls. But I am sure people enjoyed it anyways as I didn't see the last of the 20 cups when I entered the dining hall for lunch (well, 19 to be honest as my sister ate one the night before). Dessert first is best, occasionally (;

Berry Jelly Cheesecake In A Cup
Makes 10

base
1/4 cup of butter softened
1/4 cup of brown sugar
1 cup of plain flour

cream cheese layer
250 grams of cream cheese
50 grams of caster sugar (optional)
1 cup berry-flavored yogurt
1 teaspoon of gelatin powder
40 ml boiling water

jelly
1 packet of strawberry jelly
1 cup of boiling water
1/2 cup of cold water

jelly mouse
1 packet of strawberries and cream jelly
3/4 cup boiling water
3/4 cup of whole milk (ratio of milk to water are rough estimates, I used half milk and half water but can be adjusted for a creamier or lighter taste)
1 punnet of sliced strawberries

Directions:
base...

  1. Preheat the oven to 150 degrees Celsius.
  2. Cream the butter and sugar together and then fold in the flour until the mixture becomes consistent and dough-like.
  3. Divide the mixture into rough cookie shapes and place onto a baking tray covered with baking paper. Bake for about 15 minutes or until golden. 
  4. While warm, crush the cookies until they resemble fine crumbs and press into cup or mold.
  5. Chill this while making the cream cheese.
cream cheese layer...
  1. Beat the cream cheese, sugar, and yogurt together.
  2. Dissolve the gelatin in the water and then add into the cream cheese mixture.
  3. Divide mixture between the cups or mold.
  4. Chill for at least 4 hours.
jelly...
  1. Pour a cup of hot boiling water into a bowl and stir through the jelly crystals. Set aside to cool.
  2. Then add the cold water. Chill for at least 4 hours.

jelly mousse..
  1. Pour a cup of hot boiling water into a bowl and stir through the jelly crystals. Set aside to cool.
  2. Then add the milk and stir in strawberries.
  3. Add to the cups or mold. Chill for at least 4 hours.
  4. Garnish the top of the cup with more berries or cream.
Note: I would have swapped the jelly layer with the jelly mousse as milk, strawberries and jelly don't seem to mesh together too well to give a pretty look.

Monday, 14 November 2011

Decadent Chocolate Cheesecake

1 comments
When my cousin sister requested something "chocolate-y" and "cheesecake-y", I just had to put this decadent chocolate cheesecake together. I've never tried piping and decorating a cake before (I usually spoon a spoonful of cream or something and then use a toothpick to make swirls), so I was really playing with the elements I had before placing them on the cake.
It kind of looks like the macarons around the cake are half sunk into the cake, doesn't it? 
Anyways the cheesecake was a hit; creamy chocolate cheese filling, a little chocolate hit from the chocolate button, chewy chocolate macaron, and crunchy with the chocolate biscuit base . Note: best not eaten after a heavy meal (e.g. KFC or any other fast food for that matter...because we did and everyone didn't look so good afterwards). 

Decadent Chocolate Cheesecake
Serves 8-10

Ingredients:
base
125 grams of chocolate biscuits (I made my own the previous day creaming together a 1/2 cup of butter softened with 1/4 cup brown sugar, then added 1 cup all purpose flour and mixed. I spooned the mix onto baking paper into about 12 proportions and baked it for 20 minutes in a preheated oven at 150 degrees Celius)
60 grams of melted butter


filling
250 grams of cream cheese, softened
1/4 cup brown sugar
2 egg yolks (I think this can be omitted)
1 cup cream, whipped
125 grams milk chocolate

Directions:

  1. Prepare the base first by mixing the biscuit crumbs (crush the biscuits beforehand) with the butter and then press this into a 20cm diameter spring form cake pan (or prepare a cake tin by lining with baking paper). Refrigerate this.
  2. Melt the chocolate in a bowl over a pot of boiling water.
  3. Beat cream cheese until smooth then beat in the brown sugar. Add lightly beaten egg yolks and melted chocolate and mix well. Then gently fold in whipped cream.
  4. Pour over the biscuit base now in the cake pan. Then smooth the surface. Add any decorations or other elements as desired. Chill for at least 4 hours before serving. 

Sunday, 13 November 2011

Mocha Macarons

1 comments
Another Sunday afternoon, another sunny day, and another lovely day to bake. I was planning to bake a cake today but then plans changed, and I ended up experimenting with another macaron recipe.

I improvised as I went, taking the ratios of another macaron recipe and tweaking the ingredients, but I know macarons are delicate and fragile creations so I dare not change too much. And I felt like a little chocolate and a little coffee today so on top, you see, is dried coffee granules while the shells are cocoa flavored which led to the idea of the mocha flavor combination.
The cocoa powder and coffee granules really worked together and you could taste the slight bitterness of the coffee granules though the whole macaron may be sweet. The coffee buttercream with some cream cheese and the chocolate button really added to the mocha flavour combination, so overall it was a mocha hit! 
Thank you to the kind volunteer photographer. You really made the effort to plate this up, and I think you did a wonderful job because it looks like a mouth-watering picture, don't you think?


Mocha Macarons
Makes 25-30

Ingredients:
shells
80 grams icing sugar
50 grams ground almond
5 grams unsweetened baking cocoa powder
50 grams egg white (2 egg whites), room temperature
25 grams caster sugar

coffee cream cheese buttercream
1/8 cup butter, at room temperature
1/8 cup cream cheese, at room temperature
3/4 cup icing sugar
1 teaspoon hot water
2 teaspoons of instant coffee (optional: extra coffee granules to add for a stronger coffee taste)
some chocolate buttons to decorate

Directions:
shells...

  1. Sift icing sugar, almond, and cocoa powder together in a bowl.
  2. Beat egg whites until foamy, then add caster sugar a little at a time while beating at medium speed. Continue to beat until the egg whites looks glossy and forms soft peaks.
  3. Add a quarter of the almond mixture to the egg white mix and gently fold until just incorporated. Add the rest of the almond mixture to the egg white mix and gently fold until the mix looks ribbon-like and consistent.
  4. Place the mixture into a piping bag and pipe 2.5 cm rounds onto a baking tray prepared with baking paper. Bang the tray gently on counter to rid any trapped air in the macaron shells.
  5. Leave to rest about an hour or until the shells form a slight crust (when gently touched, the shells do not stick to your fingers). At about a half hour, sprinkle coffee granules to decorate the shells (I did half the batch with coffee and left the other half).
  6. Preheat the oven to 150 degrees Celsius. Bake for 12-15 minutes or until the shells are hard.
  7. Let cool before sandwiching fillings (Note: it's best served within the day, or else store the shells away in an airtight container).
coffee cream cheese buttercream...
  1. Cream the butter and cream cheese together then whip in the icing sugar.
  2. Dissolve the coffee in the hot water and add into the mixture. Beat until consistent. Add extra coffee granules if desired.
  3. When assembling the macarons, using a piping bag or ziplock bag or even a spoon (I prefer disposable piping bags with fitted nozzles, easier to manage and great results), pipe the filling in between macarons then add a layer of chocolate button before piping a little more to attach the other macaron shell. Serve within the day or else refrigerate. It can keep up to a few days.

"My Mom Says Milo Is The Best"

0 comments
When I saw a box of Milo cereal in the pantry I knew I just had to bake these Milo Doggie Cookies, adapted from Happy Home Baking, for the kids at church. As some kids have nut allergies I really try to bake nut-free recipes during big occasions or events such school parties, birthday parties, and church outings.  
I don't think Australia sells Koko Crunch but our Milo Duo and Milo Cereal is just the same. Unfortunately I didn't have the chance to buy any chocolate sprinkles but I used whatever baking decoratives we had in the pantry. I think the doggie above looks the cutest-all chocolate chips!
The large choc chip eyes in comparison to the tiny nose makes the doggies look a tad strange don't you think? 

Nevertheless these Milo doggies were a hit. Crunchy, chocolatey, full of Milo-flavour and finished within the hour.

Milo Doggie Cookies
Makes about 48

Ingredients:
180 grams butter, at room temperature
80 grams Milo
200 grams cake flour (I used self-raising cake flour)
25 grams corn flour
25 grams milk powder ( I used more Milo powder)
100 grams of choc chips
some Milo cereal
some chocolate sprinkles

Directions:

  1. Preheat 140 degress Celsius. Line two baking trays.
  2. Sift cake flour, corn flour, and milk powder (Milo).
  3. Cream Milo and butter together for about 2-3 minutes at low speed.
  4. Pour in cake flour mixture and beat for 1 minute until it forms a dough.
  5. Divide dough into 10 grams each.
  6. Insert two Milo cereals for ears into the small round dough, and add a choc chip for the nose and 2 sprinkles for the eyes.
  7. Bake for about 25 minutes. Leave it to cool and put in airtight container.

Wednesday, 9 November 2011

No Knead Bread: Just What I Need

2 comments
I agree with Happy Home Baker, these truly are "magical rolls". When my mom passed by these little beauties her first instinct was to poke it. I know she was judging whether the rolls were hard or soft. With fingers crossed behind my back, my mom exclaimed, "Wow! These are really soft!!"  
I must say, I was relieved to hear that because my mom always compares the things I bake to the things she could buy in supermarkets. If they aren't as delicious and presentable as the supermarket's, why spend all that time making it? Afterwards came taste testing. When the rolls had slightly cooled, she took the bread in her hand and halved it. After that she peered at the texture of the bread (I know, I should have took a picture of the inside...next time!), then she took a bite. To my surprise, she said it was as good as professional bakeries' back at home in Taiwan. And in Taiwan, with a bakery or two for every block you walk (my grandma's street alone has four bakeries, a ten minute stroll), there's a lot to compare to. 
You know, this is my first baked bread. I've made steamed buns before. But this is different. It's a breakthrough! For some reason, I still had it in me to try tweaking the recipe by creating savory buns out half the dough using some garlic filling from Happy Home Baking's Garlic Bread recipe. Thanks to Tray for the encouragement...you made me feel like having a go (:

You can find the recipe here.

Soft Oatmeal Cookies

3 comments
I was eager to try this recipe that my Aunty gave me and I happen to have all the ingredients in the house too.
The texture of the cookies were really soft on the inside and slightly crisp on the outside. With every bite you could really taste the components of the cookie, in fact, you could smell the cinnamon at the opening of the oven door when these little cookies were done baking.
I hope these were what my Aunty's cookies looked like, well, not stacked upon each other like a tower.
Soft Oatmeal Cookies
Makes about 40-50


  • Ingredients:

  • 1 cup butter, softened
  • 1 cup white sugar
  • 1 cup packed brown sugar
  • 2 eggs
  • 1 teaspoon vanilla extract
  • 2 cups all-purpose flour
  • 1 teaspoon baking soda
  • 1 teaspoon salt
  • 1 1/2 teaspoons ground cinnamon
  • 3 cups quick cooking oats ( 1 minutes cook oatmeal)


  • Directions:
  1. In a medium bowl, cream together butter, white sugar, and brown sugar. Beat in eggs one at a time, then stir in vanilla. Combine flour, baking soda, salt, and cinnamon; stir into the creamed mixture. Mix in oats. Cover, and chill dough for at least one hour.
  2. Preheat the oven to 375 degrees F (190 degrees C). Grease cookie sheets. Roll the dough into 1/2 sized balls of large egg , and place 2 inches apart on cookie sheets. Flatten each cookie with a large fork dipped in sugar.
  3. Bake for 8 minutes in preheated oven (I baked it an extra 3 minutes). Allow cookies to cool on baking sheet for 5 minutes before transferring to a wire rack to cool completely.

p.s.Oatmeal cookies always taste better under cooked than over cooked, so don't over cook it, or it will be very hard to chew when it's cooler. You can add nuts, raisins, or dry dates, cherries etc., so there's many different kinds of oatmeal cookies.

Sunday, 6 November 2011

Fancy A Yoyo

0 comments
Once, I went to Melbourne and I brought back a box of biscuits called Melting Moments. When I came across this recipe, it reminded me of those unforgettable biscuits. It might have been better not to have come across this recipe, but I just had to recreate that moment once more.
You'd probably be speechless after a bite of these. Honestly they are full of butter, but it's only for the moment hence it's called Melting Moment. It's also called a yoyo and the biscuit does live up to its reputation. 
Most of these were also wrapped up and stored away for the kids that my mom has to treat.
Butter melting away in your mouth. Every bite is only for a moment. 

Yoyos (or Melting Moments)
Makes 10-14

Ingredients:
biscuit
175 grams butter at room temperature
1/4 cup icing sugar
1/2 teaspoon vanilla essence
1 1/2 cups plain flour
1/4 custard powder

cream
50 grams butter at room temperature
1/2 cup icing sugar
2 tablespoons of custard powder

Directions:
biscuit...

  1. Preheat the oven to 180 degrees Celsius. Place baking paper on a tray.
  2. Cream 175 grams of butter with 1/4 cup icing sugar until light and fluffy. Add vanilla and beat. Sift flour and 1/4 cup custard powder into the butter mixture and mix well.
  3. Roll tablespoonfuls of the mixture into balls. Place on oven tray and flatten with a fork. Bake for 15-20 minutes.
cream...


  1. Meanwhile, beat remaining butter, icing sugar and custard powder together until well combined.
  2. When the biscuits have cooled completely, sandwich the cream in between two biscuits.

Source of recipe: Cookies-Collectors Edition

Gingerbread Bears, Hearts and Flowers

2 comments
My mom needed something to treat the children. So I happened to flip to a gingerbread men recipe, which I had all the ingredients for but no cookie cutter template of men.
What's gingerbread men without the men? Anyways these turned out like ordinary cut-out cookies but the aroma of the ginger really feels up the kitchen when it's baking.
My mom absolutely adored these little cookies, but I look forward to hearing what the children think.

Gingerbread Bears, Hearts and Flowers
Makes 12-24

Ingredients:
125 grams butter at room temperature
1/2 cup brown sugar
1 egg yolk
2 1/2 cups of plain flour
1 teaspoon of baking soda
3 teaspoons ground ginger
1/2 cup golden sugar (I used honey)

Directions:

  1. Preheat the oven to 180 degrees Celsius. Line an oven tray with baking paper.
  2. Cream the butter and sugar together until light and creamy. Add egg yolk and beat to combine.
  3. Sift dry ingredients together, then stir into butter mixture with golden syrup (honey). Mix and combine until it resembles a dough, then knead gently on a floured surface until smooth.
  4. Roll out the dough between 2 sheets of baking paper until about 3mm thick. Cut gingerbread cookies with cookie-cutters (continue rolling and cutting to make more), and then place in the oven to bake 10 minutes or until lightly golden.
  5. Decorate with desired toppings or icing sugar.

Source of recipe: Cookies-Collectors Edition.

Who Ordered Brownies?

2 comments
Actually my little sous baker had been requesting these for quite some time, except I never had the courage to attempt something like this. I prefer cakes, cookies, jellies, and puffy things. A brownie is like a block of chocolate, well, almost.
Since she mentioned it again today, I gave her one chance to collect all the ingredients and if she was able to find it all in the pantry, then I'd attempt it. Doesn't it look decadent (above picture)? Those white bits are actually white choc bits, making this brownie a really chocolate-sugar filled treat. It's 2cm x 4 cm x 4cm, and we made about 16 pieces though the recipe calls for 10 pieces but one little piece was enough for even the sweet-tooth sous baker.

Chocolate Brownies
Makes 10-16

75 grams butter softened
1/2 cup baking cocoa (unsweetened)
2 eggs
1 cup caster sugar
1/2 teaspoon vanilla essence
1/3 cup plain flour
1/2 teaspoon baking powder
1/2 cup white choc bits

Directions:

  1. Preheat oven to 160 degree Celsius. Line a 9cm x 14cm x 3 cm (approx.) tin with baking paper.
  2. Melt butter and stir in baking cocoa, allow to cool slightly. Beat in eggs. Stir in sugar and vanilla.
  3. Sift flour and baking powder together. Add to mixture and stir thoroughly. Stir in white choc bits. Pour mixture into tin.
  4. Bake for 45-50 minutes or until firm when pressed in centre. Leave in tin to cool for 20 minutes before removing. Allow to completely cool then cut into bars.
Source of recipe: Nestle's Baking Cocoa Can

Matcha Jelly With Red Bean

0 comments
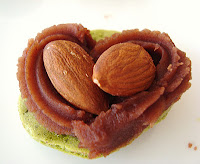
The volunteer photographer of some of these photos requested this jelly order; matcha jelly with red beans and milk. So with the left over matcha powder and red bean from the last macaron bake, we searched for a recipe.
It's really something that we'd never tried before but this making turned out alright. Interesting, just interesting. Although the flavor combinations match very well, I don't think I have the acquired taste buds to enjoy matcha-made items...yet. 


The matcha jelly recipe came from here, a real Japanese dessert.
If there were a next time, condensed milk or ice cream would match perfectly with the delicate matcha jelly.

Saturday, 5 November 2011

Cocoa Cookie Cut-Outs

0 comments
Cool, right? Just plain and simple.
Cute little cookie cut-outs for everyone. And there's no need to worry about the little things like added nuts and too much sugar, well, maybe a little. But a treat in a while is well worth the bite in the moment.

Cocoa Cookie Cut-Outs
Makes about 20

Ingredients:
1/2 cup of butter at room temperature
1/3 cup of brown sugar
1 cup of all purpose flour
50g of white choc chip to decorate (optional)

Directions:
  1. Preheat the oven to 150 degrees Celsius.
  2. Cream the butter and brown sugar together. Then add the flour in and mix to incorporate until it becomes one piece of dough.
  3. Roll it out to about 0.5 cm thickness and cut out desired shapes with cookie cutters.
  4. Decorate with white chocolate or other items (e.g m & ms, sprinkles). Note: place a piece of foil over the cookies if decorating with white chocolate as the white chocolate will become burnt.
  5. Bake on a tray with baking paper for about 20 minutes.

Time For Green Tea And Red Bean..

1 comments
Exactly as the title says, time for some green tea and red bean macarons. These little treats were made on the behalf of a request from a church friend, and I felt like trying something different, out of my comfort zone. 
You see, I didn't know where to find matcha powder (green tea powder). I've only heard of it here and there so I had no idea what it looks like, smells like or taste like. This bake gave me an opportunity to test another macaron recipe, a different ratio of ingredients.
To be honest, this is not my best macaron bake. I've made macarons a total of five times now and only one has been successful-the second bake: second the best (cliche). But I know now that macarons are a very fragile creation; every little detail of the baking process must be followed as closely and precisely as possible.
Well, they're not that hard to make. Just follow instructions and you'll be fine. They really are pretty little cookie sandwiches...not the kind you can buy at your local supermarkets. 
So if you have the time and patience to bake for a friend or with a friend, this is definitely a worthwhile bake. I know me and my little cousin (a.k.a. sous chef) love to bake together, especially a macaron recipe. When they do turn out with their little feet and all, it just gets us all giddy and jittery because our hard efforts have finally paid off.

This batch turned out a half successful as you can see from some of the pictures, half of them were cracked. But I didn't give up. I just gave it my heart's effort to finish what I started. Everyone enjoyed it (;


Green Tea Macarons With Red Bean Paste Recipe is here. 
Next time I hope I can do more justice to the recipe and its baker.
 

Yes, I can bake. Copyright © 2012 Design by Ipietoon Blogger Template